Building a Perfect Artificial Grass Putting Green
Building a Perfect Artificial Grass Putting Green: Golf4Home explain the keys to building a perfect artificial grass putting green. For keen golfers, there’s nothing quite like having your very own putting green in the comfort and convenience of your own garden.
It’s an opportunity to hone your short game, unwind, and even entertain friends. But what does it take to create a top-quality artificial putting green at home?
Let’s delve into the process of building an artificial grass putting green and see how you can turn your vision into a reality.https://golf4home.com/personalised-putting-green-design
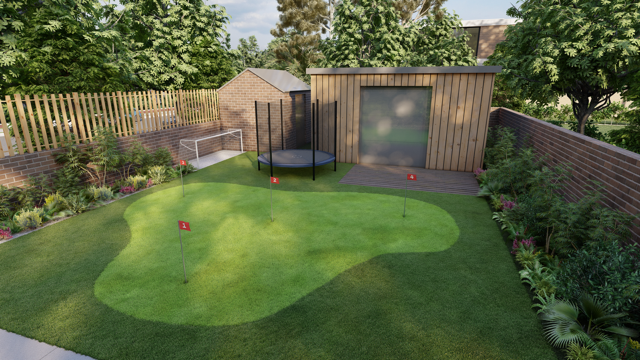
1. Site Selection: The first step in building a Golf4Home putting green is choosing the right location. Ideally, it should be a level area with good drainage, ideally with access to sunlight. Selecting the right spot is crucial for ensuring the longevity and performance of your green.
2. Design and Layout: Your vision for the putting green’s layout is key. Consider the shape, size, and contour. Do you want a simple, flat putting surface, or are you looking for a more challenging green with undulations?
3. Base Preparation: A solid base is essential for your putting green. Typically, this involves excavating the area and preparing compacted base layers. Proper compaction ensures the green remains level and doesn’t shift over time. A professionally installed base is also essential for the greens drainage.
4. Artificial Grass Selection: The type of artificial grass you choose is crucial. Our top-quality artificial putting greens feature specialised putting surfaces that replicate the feel and speed of real grass greens. We provide expert advice to select the right grass for your specific needs.
5. Installation: Installing the synthetic turf correctly is vital to achieve the desired playability. It must be stretched and secured precisely to eliminate wrinkles and create a smooth, consistent surface. The fringe or rough around the green should also be installed meticulously.
6. Contouring and Breaks: To make your putting green more interesting, consider adding contouring and breaks to simulate the challenges you encounter on a real golf course. These subtle undulations can transform your green into a practice haven.
7. Infill Material: Infill material, typically made of sand, is spread across the green to add weight and stability to the turf. It also helps to provide a consistent ball roll and aids in drainage.
8. Cup Installation: Installing regulation-sized cups or cups with flags is the final touch. These cups are positioned strategically on your green to practice various putt lengths.
9. Regular Maintenance: To keep your putting green in top-notch condition, regular maintenance is necessary. This includes brushing the surface, keeping it clean, and ensuring the infill material remains evenly distributed.
10. Enjoyment and Practice: Now that your top-quality artificial putting green is complete, it’s time to enjoy it. Practice your putting skills, challenge friends and family to a friendly competition, and relish the convenience of having a world-class putting green in your backyard.
In summary, building a top-quality artificial putting green for your home is a process that requires careful planning, precision, and attention to detail. With the right location, design, and expert installation, you can create a putting green that not only enhances your golf game but also adds a touch of luxury to your outdoor space.
The result? An oasis for golfers that combines fun, practice, and the joy of the game right at your doorstep.
For more information please contact our team sales@golf4home.com https://golf4home.com/contact-golf4home